I’ll never forget the day my dryer decided to quit mid-cycle, leaving a mountain of damp laundry and a sense of impending doom. My first instinct was to call a technician, but the thought of the service fee, coupled with a two-week wait, spurred me into action. What I discovered through that experience, and countless others since, is that a methodical household appliance repair workflow for non-technical users isn’t just possible, it’s empowering. Many common appliance issues, from a noisy refrigerator to a dishwasher that won’t drain, can be diagnosed and often fixed with a little patience, a basic toolkit, and the right approach. It’s about demystifying the process and giving you the confidence to tackle those pesky household glitches head-on, saving you money and reducing waste in the process.
Initial Assessment: The Detective Work
Before you even think about grabbing a screwdriver, the most crucial step in any successful household appliance repair workflow is thorough diagnosis. This phase is all about being a detective. Start by observing the symptoms: what exactly is the appliance doing, or not doing? Is it making an unusual noise, refusing to power on, or failing to complete its cycle? Always begin by ensuring the appliance is safely unplugged, checking the circuit breaker, and inspecting the power cord for any visible damage. These seemingly simple checks can often reveal the culprit without any further investigation.
- How to Choose the Right Power Tools for Home Repairs
- How to Maintain Household Appliances for Better Performance
- How to check hand tool quality standards to ensure lifetime durability and safety
- Why Is My Fridge Not Cooling? Failure Analysis & Repair Standards Guide
- Essential Hand Tools Every Homeowner Should Have
Once basic power is verified, consult your appliance’s user manual. Many manuals include a troubleshooting section that lists common problems and their solutions. If the manual isn’t handy, a quick online search for your appliance’s make, model, and the specific symptom can yield a wealth of information. Forums and manufacturer websites are goldmines for identifying known issues and frequently offered fixes. This initial research helps you narrow down potential causes, preventing unnecessary disassembly and guiding your next steps effectively towards a resolution.
Gathering Your Toolkit & Resources
For most non-technical household appliance repairs, you won’t need a professional’s arsenal of tools. A basic toolkit typically suffices, comprising screwdrivers (Phillips and flathead), pliers, a nut driver set, and possibly a multimeter for testing electrical continuity. Safety gear, such as work gloves and safety glasses, is non-negotiable, especially when dealing with sharp edges or potential electrical hazards. Having these essentials readily available means you won’t have to pause your repair mid-way to hunt for the right instrument, streamlining your efforts.
Beyond physical tools, your most valuable resources are often found online. Websites like Repair Clinic or YouTube channels dedicated to DIY fixes provide step-by-step video guides that can be incredibly helpful. Always ensure you’re looking for content specific to your appliance’s make and model. The wealth of information available in 2026 means that almost any common issue has been documented and demonstrated, offering visual instructions that are far easier to follow than abstract written directions. Don’t underestimate the power of a good tutorial.
Why OEM Parts Matter
When it comes to replacing components, opting for Original Equipment Manufacturer (OEM) parts often pays dividends in the long run. While aftermarket parts might seem like a more budget-friendly option upfront, they can sometimes lead to compatibility issues, reduced performance, or a shorter lifespan for the repair. OEM parts are designed specifically for your appliance model, ensuring a perfect fit and optimal functionality, which contributes significantly to the longevity and reliability of your fix. This small investment can prevent future headaches.
The Repair Attempt: Step-by-Step Execution
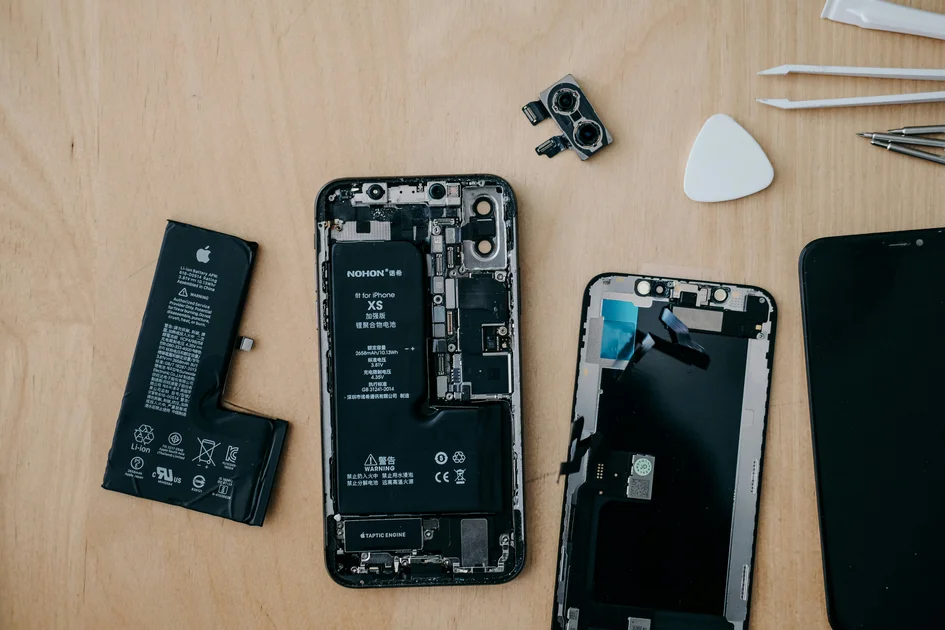
With your diagnosis in hand and tools ready, it’s time for the hands-on repair. Before disassembling anything, take clear, well-lit photos of each step of the process. Trust me, you’ll thank yourself later when it comes to reassembly. Label wires, screws, and components as you remove them, perhaps using masking tape and a marker, or even placing them in small, labeled containers. Patience is paramount here; rushing through disassembly can lead to stripped screws, broken clips, or forgotten connections, turning a simple fix into a much larger problem.
Perform the actual repair, whether it’s replacing a faulty part, cleaning a clogged filter, or tightening a loose connection, following your researched instructions meticulously. Take your time, double-checking each step. Once the repair is complete, meticulously reassemble the appliance, referring to your photos and labels. Before powering it back on, do a final visual inspection to ensure all connections are secure, no tools have been left inside, and all panels are correctly reattached. This careful approach minimizes the risk of further damage or missed steps.
Testing and Verification: The Moment of Truth
After reassembling your appliance, the next critical step in the household appliance repair workflow is thorough testing. Don’t just plug it in and assume success. Run a complete cycle or perform the specific function that was previously failing. For instance, if you repaired a dishwasher, run an empty wash cycle and carefully check for leaks. For a refrigerator, monitor its temperature over several hours. Pay close attention to any unusual noises, smells, or continued malfunctions. This verification process confirms whether your repair was successful or if further investigation is needed.
If the appliance still isn’t functioning correctly, don’t despair. This is a common occurrence even for experienced DIYers. Go back to your notes and photos, re-evaluate your diagnosis, and consult additional resources. Sometimes, a problem can have multiple causes, or you might have overlooked a subtle detail. At this point, it’s also wise to consider the value of your time and the potential cost of professional help. There’s no shame in calling in an expert, especially for complex electrical issues or if you feel out of your depth. Knowing when to escalate is a mark of true expertise, particularly in 2026 with increasingly complex smart appliances.
Preventative Measures and Future-Proofing
Once your appliance is back up and running, consider implementing a preventative maintenance schedule. Simple tasks, like regularly cleaning your refrigerator coils, descaling your coffee maker, or clearing lint from your dryer vent, can significantly extend the life of your appliances and prevent future breakdowns. Many manufacturer websites offer detailed maintenance guides specific to their products. Embracing these habits not only saves you money on future repairs but also ensures your appliances operate at peak efficiency, which is increasingly important for energy consumption.
Finally, always weigh the cost of repair against the cost of replacement. If an appliance is particularly old, inefficient, or has a history of frequent breakdowns, investing in a new, more energy-efficient model might be the more economical and environmentally sound choice in the long run. Modern appliances, especially those available in 2026, often come with advanced features and better energy ratings. While the satisfaction of a DIY repair is immense, knowing when to gracefully retire an appliance and upgrade is a crucial part of smart home management.
Key Takeaways
- Safety First, Always: Before beginning any repair, ensure the appliance is unplugged and the circuit breaker is off. Prioritize personal safety with gloves and safety glasses, especially when dealing with electricity or sharp components.
- Diagnosis is Your Superpower: Invest significant time in understanding the problem. Research symptoms, consult manuals, and utilize online forums before touching a single tool. A precise diagnosis saves time, effort, and prevents potential damage.
- Leverage Online Resources Liberally: The internet is a treasure trove for non-technical users. YouTube tutorials, manufacturer troubleshooting guides, and community forums provide invaluable step-by-step instructions and visual aids for almost any common appliance issue.
- Know When to Call a Pro: While DIY repair is empowering, recognize your limits. For complex electrical problems, gas appliances, or repairs that require specialized tools or knowledge, don’t hesitate to contact a certified professional.
Frequently Asked Questions
Is it always cheaper to repair an appliance myself than to call a professional?
Not necessarily. While DIY repair often saves on labor costs, the cost of parts, your time, and the risk of further damage if the repair goes wrong must be considered. For minor issues with readily available and inexpensive parts, DIY is often cheaper. For major component failures or complex electrical problems, a professional might be more cost-effective in the long run, ensuring the job is done right and safely.
What are some of the most common household appliance repairs non-technical users can attempt?
Many common issues are surprisingly simple to fix. These include replacing a dryer’s thermal fuse, cleaning a washing machine’s drain pump filter, resetting a garbage disposal, replacing a refrigerator’s water filter, or clearing clogged dishwasher spray arms. These repairs typically require minimal tools and are well-documented online with clear instructions.
When should I definitely call a professional for an appliance repair?
You should always call a professional for repairs involving gas appliances (e.g., gas stoves, dryers), any issue that involves high-voltage electrical components that are difficult to access safely, or if you suspect a refrigerant leak in a refrigerator or freezer. Additionally, if the repair requires specialized tools you don’t own or if you feel uncomfortable or unsafe at any point, it’s best to defer to an expert.
How can I ensure I’m getting reliable replacement parts for my appliance?
The best way to ensure reliable replacement parts is to purchase them directly from the appliance manufacturer’s official parts website or from authorized dealers. Always use your appliance’s full model number to ensure compatibility. While third-party sellers exist, verifying their reputation and return policy is crucial to avoid counterfeit or low-quality components that could compromise your repair.
Conclusion
Embarking on a household appliance repair workflow for non-technical users might seem daunting at first, but with a structured approach, a dash of patience, and the incredible resources available today, it’s an incredibly rewarding endeavor. You’re not just fixing a machine; you’re cultivating self-reliance, extending the lifespan of your belongings, and making a tangible contribution to reducing waste. The confidence gained from successfully troubleshooting and repairing something yourself is invaluable. So, next time an appliance acts up, remember: you’ve got this. Take a deep breath, follow the steps, and empower yourself.